

How To Audio Live In Facebook Iphone
Using an External Audio Interface with Facebook Live and Camera App on iOS
![]()
Facebook Live recordings as well as general video recording for Youtube and other video streaming providers is an excellent way to share. In many cases, it would be better if the audio recorded on these sessions were higher quality, mixed with other audio channels like from your computer — essentially better sounding as the microphones on your iOS device although pretty good, were made for very basic audio fidelity — TELEPHONY.
At iConnectivity we agree — i t sure would be nice to use more professional audio interfaces with Facebook Live and the Camera App on iOS. The iConnectAUDIO2+ (and of course the iConnectAUDIO4+) are perfect companions for this — but really you could use any external audio interface that is either MFi certified our through the Camera Connector Kit (CCK).
Check out our Facebook Live session showing how to use an external audio interface with Facebook Live and the Camera App on an iOS device — scroll down further to see more details of how we set this up and more details.
Using External Audio Interface with Facebook Live
Facebook Live, as with most audio recording applications on iOS, will take the audio channels 1 and 2 as a stereo input. It does not appear there is any other option with Facebook Live to select other channels nor select audio source for input. Therefore the application utilizes what is known as system audio. As there is no control panel or settings panel to set what is system audio in and out, you need to rely on the iOS default functions. The system audio source and destination is the last audio interface connected.
Therfore, to use with Facebook Live, you need to plug in your external audio interface last. If you are not sure your external interface was the last item plugged in, we recommend you disconnect and reconnect again.
Facebook Live seems to accept the current system audio source, therefore you can plug in your external audio interface in the middle of a session like we did in our video — however it is probably best to have everything setup prior to starting your Facebook Live session.
Using External Audio Interface with Camera App
Using the iOS Camera App can be a little more tricky as it seems launching the application forces the iOS device to reset its system audio selection. It requires certain steps to be taken to make it work. Again, audio channels 1 and 2 are used as a stereo pair by the Camera App, so be sure to configure your audio to use these channels.
The steps you need to take with the Camera App:
- With your external audio interface disconnected, Launch Camera App on iOS device.
- Be sure to put the Camera App into the desired capture mode (Video)
- Plug in your external audio interface.
- Wait a few seconds for the audio interface to initialize.
- Start your recording.
How to Configure your iConnectAUDIO2+ As Used in Our Video
The iConnectAUDIO2+ (and iConnectAUDIO4+) allow you to use your computer with your iOS device, sharing the audio inputs and outputs as well as passing audio between your iOS device and computer. The interface also includes multiple internal audio mixers, several MIDI management features and more. To help the user we provide the following configuration details used for the video.
The interface is connected as follows:
- Macbook Pro connected through USB 2.0 to Device Jack 1 on rear of device using standard USB cable.
- iOS sync cable (supplied with your iOS device) connected to the USB A port of USB 2.0 jack 2 on rear of device. In the video I was using the optional 9V power adapter which charges the iOS device. The iConnectAUDIO2+ can be powered by the computer on USB Device Jack 1.
- The microphone is connected to the front Combo Jack for channel 1.
- GarageBand is configured to output audio on channels 1 and 2 of the iConnectAUDIO2+ port.
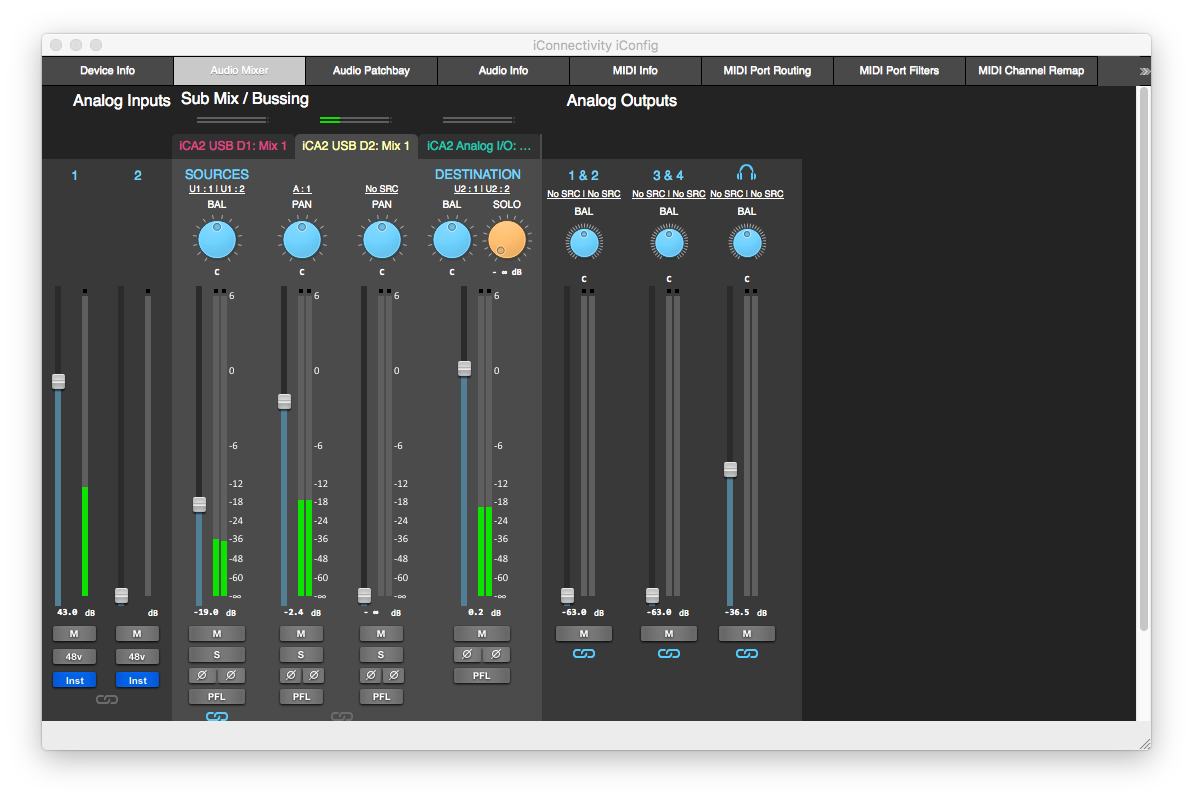
There are a few steps you need to take with iConnectAUDIO2+ to configure it like in the video — use iConnectivity iConfig (iConfig for Audio on iOS) to perform the following settings. By default, iConnectAUDIO2+ only enables mixers for the audio jacks — you will need to configure through Audio Info tab for a mixer on the USB Device Jack.

Next you need to make sure the audio channels 1 and 2 from your computer are available to the mixer, the microphone is available to mixer, and the mixer output goes to audio channels 1 and 2 of your iOS device. You will note that the USB D2 mixer is used as the mixer needs to match the output — USB D1 mixer for ouput to D1, USB D2 mixer for ouptut to D2 and Analog Mixer for output to analog ports.
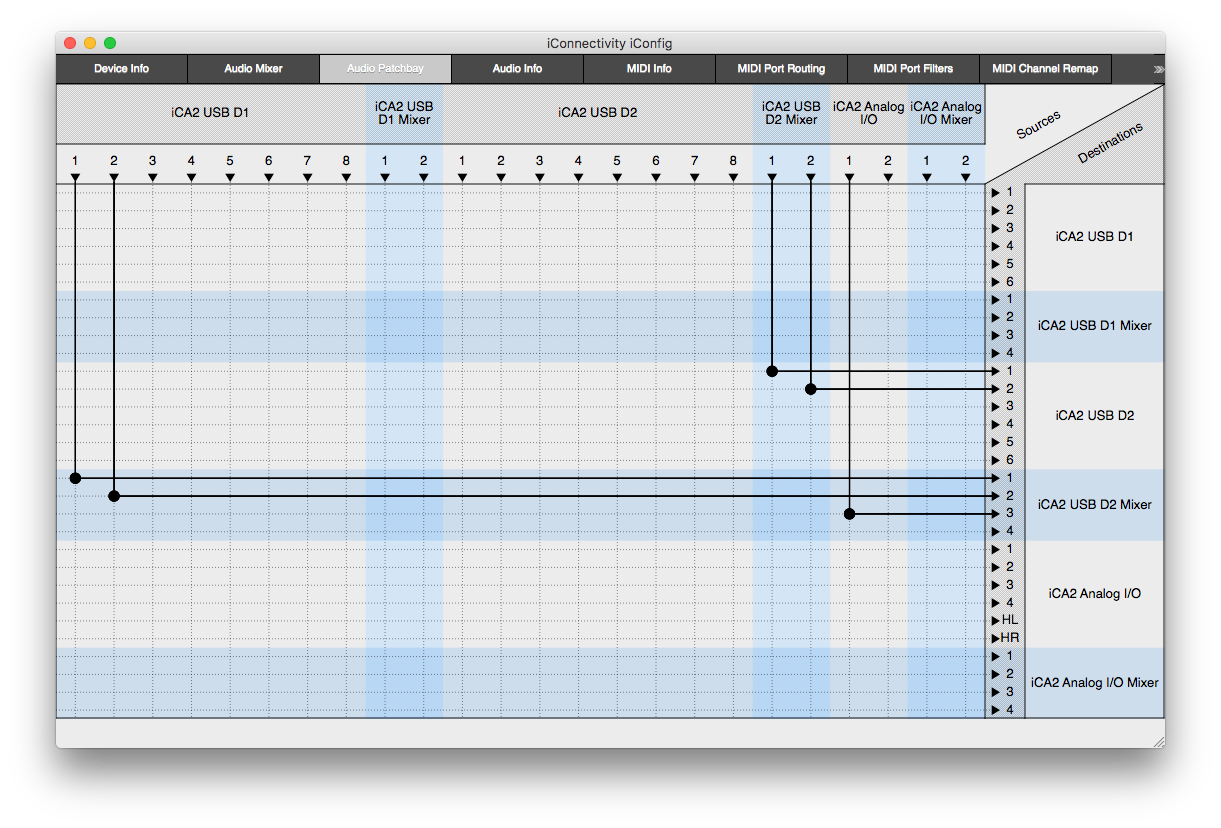
Finally you need to make sure to set your gain levels of audio input and mixer. This is done in the Audio Mixer tab.
Hope this is useful for you — have fun. As always, if you need some help in setup of iConnectivity gear, please submit a support ticket.
How To Audio Live In Facebook Iphone
Source: https://medium.com/@ajoelson/using-an-external-audio-interface-with-facebook-live-and-camera-app-on-ios-f452ef8285ad
Posted by: fletcheraccee1978.blogspot.com
0 Response to "How To Audio Live In Facebook Iphone"
Post a Comment